
This is a quick lesson. A glass bowl. The scene below shows a bowl that we have worked with in the 3DbyBuzz video tutorials. It has a Mental Ray mia material on it, set to GlassThin.
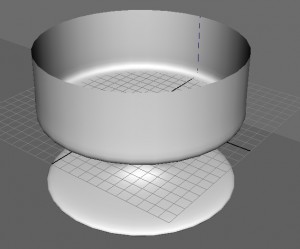
The floor and the wall both have the checkerboard 2D texture from the Hypershade. Add light. There are two lights in the scene, one coming from the upper right and another coming from the upper left. Both are spot lights. The light on the right is far brighter than the one on the left. Thus, when we render the scene (with the Mental Ray renderer), we would expect to get a shadow cast to the left. Depth map shadows. Here is what happens when we select the light on the right, go to its attributes (you might have to hit control-a), then go to Depth Map Shadow Attributes and click Use Depth Map Shadows:
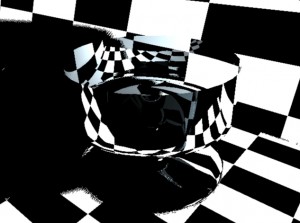
Raytraced shadows. Now, if we go back to the attributes of the right hand light, and go to Raytrace Shadow Attributes and click Use Ray Trace Shadows (which toggles the Depth Map shadows off), we get:
Notice how much softer the ray traced shadows are.
Ray tracing as a light attribute.
We see here that ray tracing isn’t only a setting that we can adjust in the Mental Ray renderer. Ray tracing can also be turned on in the shadow properties of each light.
Depth map shadows are calculated by tracing each light ray (or photon) across the scene once, thus casting a black shadow, even though the dish is made of glass. Ray traced shadows are based on more calculations, as light reflects and refracts.